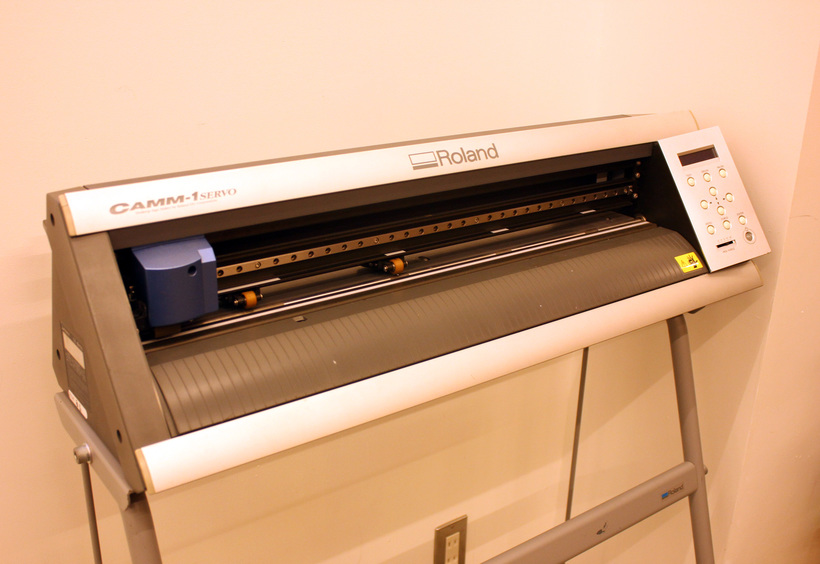
How to use paper cutter "Roland GX - 24"
This manual is an step by step guide on how to cut with a vinyl cutter
Machine specifications
Attachable sheet width 50mm to 700mm
Mounting length Flat type seat: 100 mm or more Roll sheet: up to 1600 mm
Maximum cutting area 584 mm × 24998 mm (operable range) ※ The accuracy guarantee range is 1600 mm
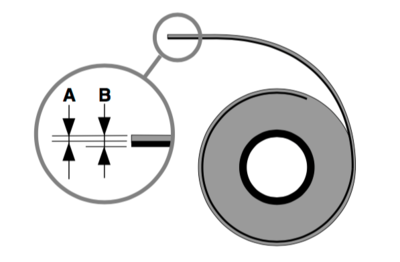
Thickness A sheet thickness: 0.1 mm or less B Thickness including backing sheet: 0.3 mm or less (Installation of sheets can be up to 1.0 mm) Small 2015 12 10 11.36.55
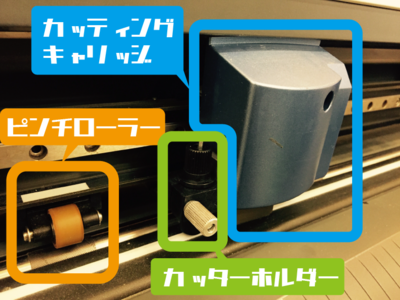
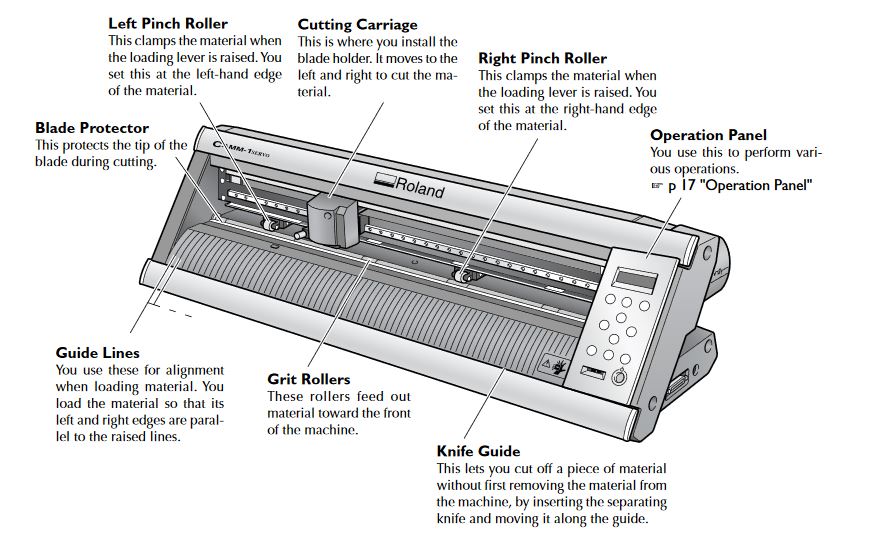
Machine Components
-
Cutting carriage A cutter holder is attached here and it moves to the left and right. Power on → move with left and right arrow button Power OFF → Move by hand
-
Pinch roller Two are attached. Cut between the pinch rollers. You can move it with your hand with the lever in the up position.
-
Cutter holder Here is the blade of the cutter.
Machine Details
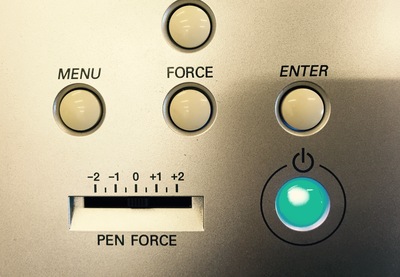
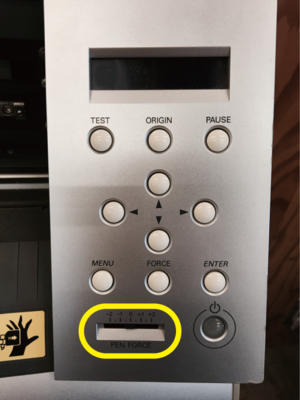
Machine Operation Panel
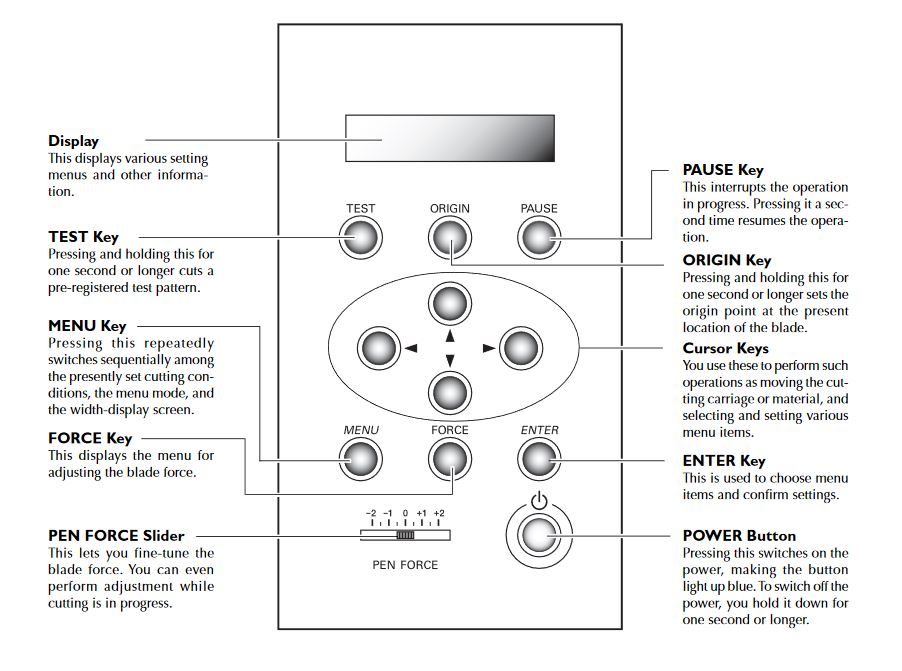 PEN FORCE: Do not tamper with basic (default 0)
STEPS SUMMARY
- Set the sheet
- Turn on the power supply
- Cutter blade adjustment
- Test Cut
- Change cut pressure/ test cut
- Origin set
- Data creation
- Cut and enjoy!
01.Mounting the sheet
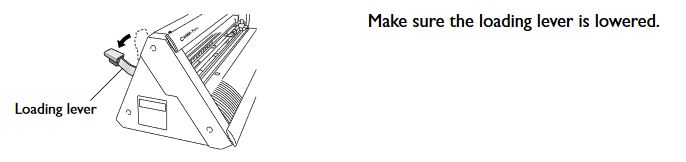
Pressure lever
Place the roll and its table behind the cutting machine and check that the lever is going down
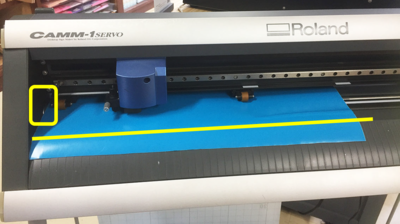
Mounting the sheet
- Align the sheet to the far left
- Pull the sheet to the position where the sheet is on the guideline
- Place the pinch roller under the pinch roller position check mark.
Since it can only be processed within the range sandwiched between pinch rollers, be sure to set pinch rollers at the position that matches the size you want to process!
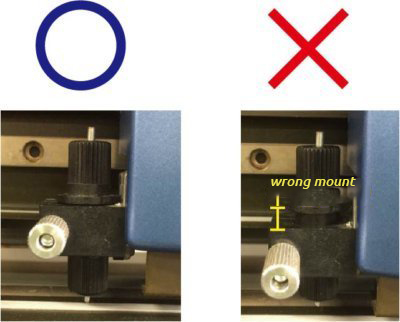
Correct mounting position
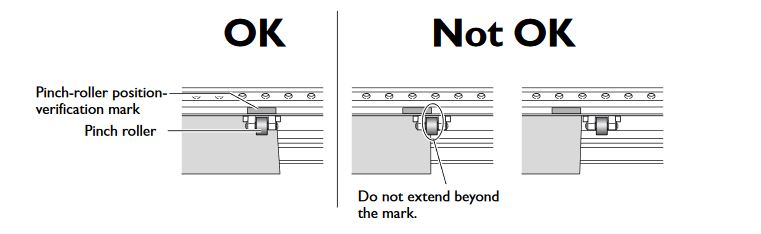
Place the pinch roller so that it does not overflow or overflow the edge of the sheet
Make the sheets parallel
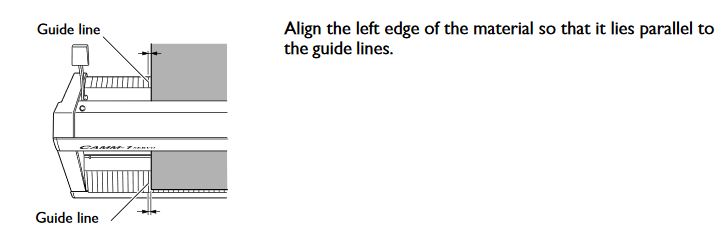
Fit the left edge of the sheet so that it is parallel to the guideline
- Especially when cutting by roll, even if it is slightly misaligned, it leads to large gap
Fix sheet
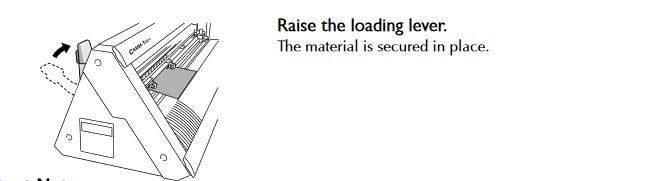
Raise the lever to secure the seat
- If you raise the lever swiftly, it may break. Operate the lever slowly.
02.Installation of cutter**
Insert the cutter holder while supporting the screw.
If it is properly inserted as shown in the picture OK.
Basically, it does not take out because it adjusts the cutting condition with cutting pressure.
03.Turn on power**
Connect the power cord
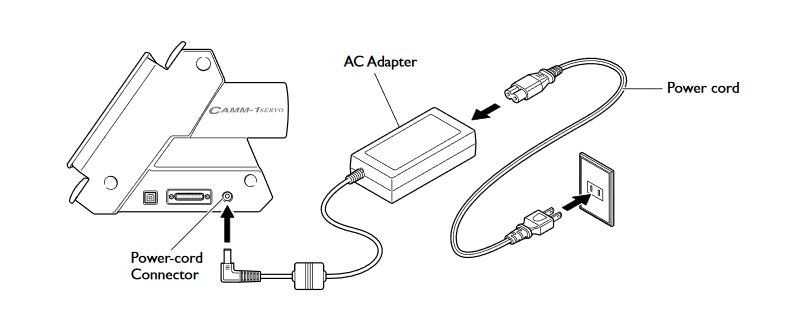
Connect dedicated cord
Turn on power
Press the power button → the button glows blue
03.Selection of sheets
Select [Roll] or sheet.
Measure roll → W (width) only Measure sheet → W (width) / L (length)
Select a sheet
Select [Role] or a precuted piece of vinyl
- When you press the power button, the cutting carriage moves automatically.
- Sheet roll
As it is displayed, just press the [ENTER] button.
Measure the length of the seat
It automatically measures the length of the width of the sheet. Please note that it starts to move ※!
Sheet length indication
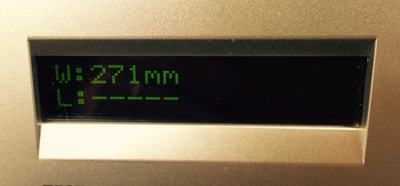 When the sheet loading is completed, the cuttable width is displayed
W = width
L = length (only when it is not a roll)
When the sheet loading is completed, the cuttable width is displayed
W = width
L = length (only when it is not a roll)
This time W (width) 271 mm
Actual range
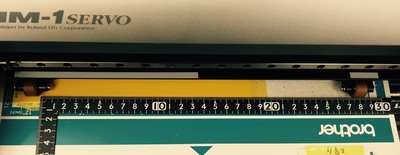 The actual range is between the pinch rollers as shown in the figure.
Small img 2922
The actual range is between the pinch rollers as shown in the figure.
Small img 2922
04.How to test cut
We need to do a test cut to be sure the pressure is the adecuate.If it is not cutting well enough, it is necessary to change the cutting pressure. The way to do this is explained in the step 05 below.
Confirm PEN FORCE knob
Set the scale of the knob of a place with the notation PEN FORCE to [0].
Basically do not move!
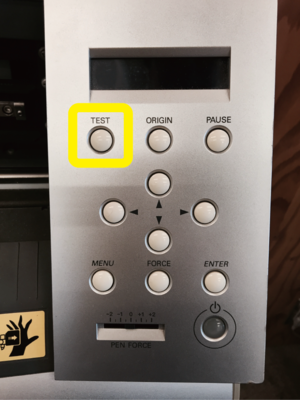
TestCut
If you hold down the test button for more than 1 second, test cut is done
Confirm the cut
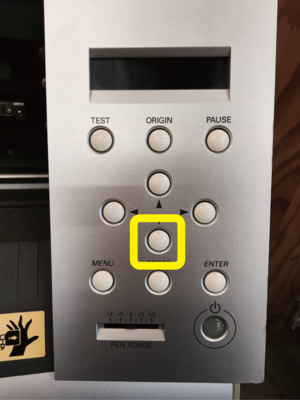
Press [↓] to send the sheet forward
Peel off the cut part
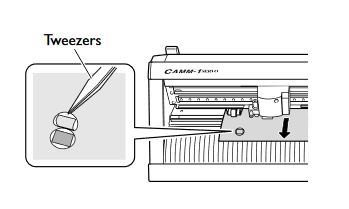
Peel off the cut figure with tweezers and check the cut condition.
I would like to scratch a little on the lower support.
05.Change the cutting Pressure
Try cutting the test and change the cut pressure when it fails. Cut pressure is between 30 gf to 250 gf
Adjust the pressure
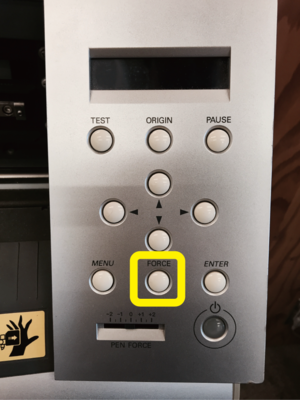
Cut pressure change
When you press the 【→】 button, 【※ value】 is displayed below the screen as shown
Cut pressure change
[↑] [↓] button to set the value. Decided by 【ENTER】 button.
Back to menu
Return to the screen with 【MENU】 button or 【←】 button. The changed value is displayed.
TestCut again
After changing the cut pressure, cut the test again. At this time do not forget to move the blade position with 【← ↑ ↓ →】 button
Repeat the above procedure until the test result is OK.
TIP
After cutting off and peeling off, it is ideal that it gently scratches the lower mount!
06.Origin setup
To determine the cutting position, set the origin. Do not overlap with the test cut place.
Move the sheet
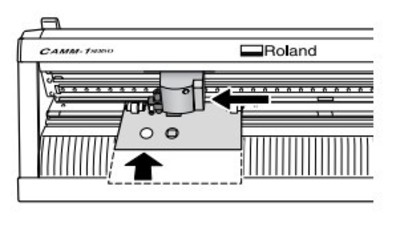 Move the seat back so that the place where you cut the test comes before.
Range to cut
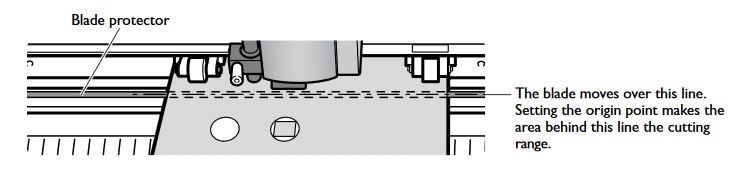 When the origin is set, the rear side from the line in the figure is set as the processing range
Set the origin
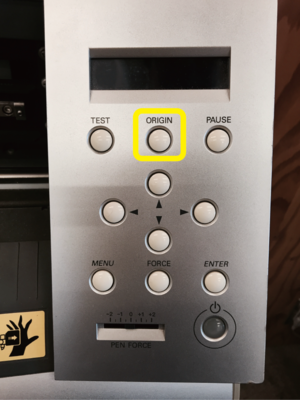
- Press and hold [ORIGIN] for 1 second or more.
- Screen 1 flashes.
- When setting is completed, screen 2 is displayed
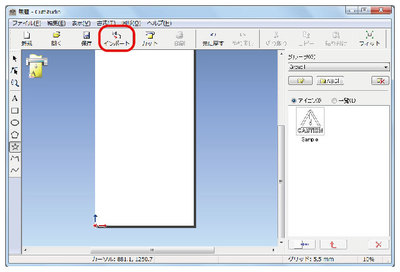
07. Cut Procedure CUT STUDIO
You can create and output data with CutStudio dedicated software. Here we describe the output of data.
01 STEP
- Click [Import] → Select data
02 STEP
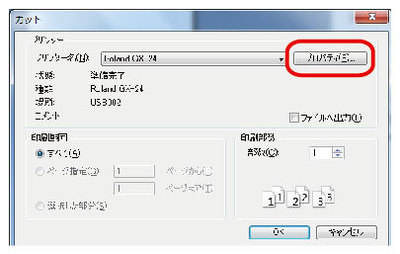
- Click [Cut] → Dialog appears

03 STEP
- Click Properties in the dialog
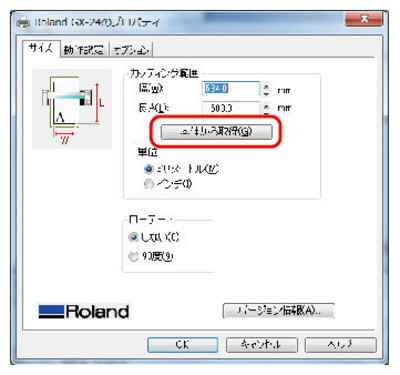
04 STEP
- Click [Acquire from main unit] on the size tab (the value read by the unit when setting the sheet is reflected)
- Connect the main unit and PC with a USB cable!
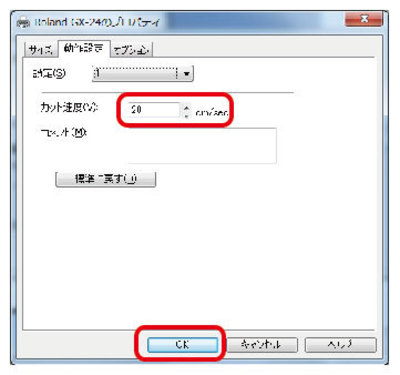
05 STEP
- On the Operation Setting tab, set the cutting speed and click [OK]
- When you click [Setting of main unit], the numbers from 1 to 8 are displayed in a pulldown, and the cut speed setting can be saved for each number
06 STEP - MOST IMPORTANT
CLEAN UP YOUR MESS! AND HAPPY CUTTING
Other Manuals/References
Original tutorial by:
-
FablabDazaifu, Fabble.cc 12.2015 Updated 13.03.2018
-
Eduardo Chamorro, Fab Lab Barcelona 02.2019
Licensed under a Commons Attribution 4.0 International License